全部 文章 问答 分享 共找到690个相关内容

[文章] aosp10-刷入pixel4XL设备
这里我的设备是GooglePixel4XL一、下载Windows或者Linux驱动由于我是通过USB连接手机设备,所以我需要在WIndows上和Linux上安装对应的驱动,电脑才能准确识别到设备Pixel


[文章] aosp-添加手势导航
版本:aosp-10-r41设备:pixel4XLaosp10的版本中是由手势导航功能的,不过系统把这个功能给隐藏了起来步骤找到源码目录下的*/frameworks/base/core/res/res/

[文章] 单独打开AS的虚拟机
\emulator.exe-avdPixel_XL_API_30如下图所示。

[文章] C语言入门(4)
:).4.switch语句.内容1.顺序,选择与循环语句顺序,选择与循环结构是程序的三种基本结构.任何算法都可以用这三种结构表示出来.1.1顺序1.2选择1.3循环结构算法的特性1.有穷性:在合理的时间内完成

[文章] 空闲磁盘挂载(ext4 格式版)
新建data目录:cd/mkdirdata1.列出所有可用块设备的信息lsblk2.查看待分区的磁盘/dev/vdb的信息fdisk-l3.查看磁盘信息,挂载类型df-Th4.对/dev/vdb磁盘进行分区
[文章] Sublime Text 4恢复默认菜单栏而不是汉堡菜单
起因今天升级了一下SublimeText从3升级到4结果原本的菜单栏变为了汉堡菜单使用起来不太方便。起初以为是4版本的新特性。

[文章] Swift快速入门基本运算符(4)
//如图://你可以给9当中放进两个4去,这样就得到了1这个余数(橘黄色的部分)。
2020-10-12 20:42
·
Swift
[文章] UIKit快速入门之UIButton(4)
caseinfoDark=4//该属性使得按钮呈现一个带+号的联系人图标。casecontactAdd=5@available(iOS13.0,*)//该属性使得按钮呈现一个带X号的关闭图标。

[文章] OkHttp4 RequestBody.create() 提示过时
OkHttp4写法kotlin版本:importokhttp3.MediaType.Companion.toMediaTypeimportokhttp3.RequestBody.Companion.toRequestBodyimportokhttp3
2022-12-04 18:20
·
划水


[文章] Kotlin进阶学习4
写在前面本文接上文:Kotlin进阶学习3。上次文章主要学习了泛型的一些基本用法,这次来学习一下泛型的进阶用法。这部分还是有很大的难度的,勉强记录一下。泛型的实化介绍泛型实化这个概念,其实对于学Java的很陌生。这里得先解释一下Java的泛型擦除机制。Java的泛型功能是通过类型擦除机制来实现的。就是说泛型对于类型的约束只在编译时期存在,运行的时候仍然按照JDK1.5之前的机制(即无泛型),JVM是识别不出来我们在代码中指定的泛型类型的。也就是说比如我们创建了一个List,虽然我们在编译约束我们必须输入String类型,但在运行时期只能识别出来他是个List,并不知道他的包含哪种类型。所有基于JVM的语言,泛型功能都是基于类型擦除实现的。其中自然包括了Kotlin,因此我们无法使用T::class.java这样的语法,因为T的实际类型在运行的时候已经没了。但Kotlin有一个内联函数的概念,这也就意味着Kotlin中是可以将内联函数中的泛型进行实化的。使用要使用泛型实化,首先必须是内联函数,其次要在声明泛型的地方加上reified关键字来表示该泛型要进行实化:inlinefun<reifiedT>getGenericType(){}既然泛型实化了,那么就可以实现Java中不可能实现的一些功能了:inlinefun<reifiedT>getGenericType()=T::class.java测试代码:funmain(){valresult1=getGenericType<String>()println("result1is$result1")}可以看到,我们实现了一个不可思议的功能。可以获得类型了。应用我们可以使用泛型实化对安卓中的一些操作进行优化,比如启动activity的操作:valintent=Intent(context,TestActivity::class.java)context.startActivity(intent)我们新建一个kt文件:inlinefun<reifiedT>startActivity(context:Context){valintent=Intent(context,T::class.java)context.startActivity(intent)}这里我们定义了一个方法,里面实现了Activity的启动。这样我们要写启动activity时,就十分简单了:startActivity<TestActivity>(context)但这样似乎不能实现intent附加参数的用法了。我们可以改一下代码:inlinefun<reifiedT>startActivity(context:Context,block:Intent.()->Unit){valintent=Intent(context,T::class.java)intent.block()context.startActivity(intent)}这里我们使用了高阶函数,定义了一个在Intent类里的拓展方法,这样就可以实现传入值的做法了:startActivity<TestActivity>(context){putExtra("param1","data")putExtra("param2",123)}这样看来,这种写法要比之前的写法要看起来舒服的多。泛型的协变和逆变这方面的内容我看了好几遍书,愣是没看懂。先占个坑,等看懂了再来继续写。当然也可能不更新了,毕竟这两个特性并不是很常用。委托介绍委托是一种设计模式。它的基本理念是操作对象自己不会去处理某段逻辑,而是委托给另外一个辅助对象去处理。Kotlin中也是支持支持委托功能的,分为类委托和委托属性。我们分条学习:类委托类委托的核心思想在于将一个类的具体实现委托给另外一个类去完成。我们都知道Set这种数据结构,它是一个接口,使用时要调用他的实现类,比如HashSet。而借助委托模式我们可以轻松实现一个自己的实现类:classMySet<T>(valhelperSet:HashSet<T>):Set<t>byhelperSet{}其中by是Kotlin中委托使用的关键字。这样子声明后,当我们需要对某个方法重新实现的时候,只需要单独重写那一个方法就可以了。类委托可以让我们免去重写那些大量重复的模版代码,而只专注于自己的方法或者重写需要重写的方法。委托属性委托属性的核心思想在于将一个属性(字段)的具体实现委托给另一个类去完成,比如:classMyClass{varpbyDelegate()}这样的写法,意味着将p属性的具体实现交给了Delegate类去完成,当调用p属性的时候自动调用Delegate类的getValue()方法,当赋值的时候自动调用Delegate类的setValue()方法。因此,我们也得实现Delegate类才行:classDelegate{varpropValue:Any?=nulloperatorfungetValue(myClass:MyClass,prop:KProperty<*>):Any?{returnpropValue}operatorfunsetValue(myClass:MyClass,prop:KProperty<*>,value:Any?){propValue=value}}这是一种标准的代码实现模版。在Delegate类中必须实现getValue()和setValue()方法,且必须都要使用operator关键字进行声明。在方法上,出现了一个KProperty<*>,它是Kotlin中的一个属性操作类,可用于获取各种属性相关的值。虽然在这用不着,但必须加上声明。<*****>代表你不知道或不关心泛型的具体类型,只是为了通过语法编译而已。实际上,有一种情况也可以不用在Delegate类中实现setValue()方法,那就是MyClass中的p属性是使用val关键字声明的。也很好理解,val关键字是无法在初始化后被赋值的,自然也就不需要实现setValue()方法了。总结本次学习的内容有点少,因为Kotlin的知识学习的也差不多了。接下来会尝试记录下协程的相关内容,协程作为Kotlin中很有特色的一个功能,内容很多。就不在这里展开了。总的来说,这里学习了Kotlin中的泛型的一些高级特性,补充了委托的相关内容。实际上这都是一些简单的笔记,具体的使用还是要在实际开发中应用。

[文章] 【学习笔记】【领券联盟】前端(Nuxt.js)——4.编写公共低部
c9302c;}.menu-active{background:#0000000a;}#header{height:70px;background:#fff;box-shadow:0px5px10px#d4d4d4

[文章] 4、Android开发基础-相对布局
Android开发基础之相对布局上一篇文章我们学习了线性形布局相对布局,也就是要有参照物的布局。小时候我们上学,同学与同学之间,谁在谁的右边,谁在谁的左边!这就是相对于谁来说的!在Android中的相对布局也一样!有两种,一种是相对于老爸来说,也就是父控件来说的,另外一种是相对于同级控件来说的!相对布局相对于父控件<?xmlversion="1.0"encoding="utf-8"?><RelativeLayoutxmlns:android="https://schemas.android.com/apk/res/android"android:layout_width="match_parent"android:layout_height="match_parent"><Buttonandroid:layout_width="wrap_content"android:layout_height="wrap_content"android:layout_centerInParent="true"android:text="中间"/><Buttonandroid:layout_width="wrap_content"android:layout_height="wrap_content"android:layout_alignParentRight="true"android:text="右上角"/><Buttonandroid:layout_width="wrap_content"android:layout_height="wrap_content"android:layout_alignParentBottom="true"android:layout_alignParentRight="true"android:text="右下角"/><Buttonandroid:layout_width="wrap_content"android:layout_height="wrap_content"android:text="左上角"/><Buttonandroid:layout_width="wrap_content"android:layout_height="wrap_content"android:layout_alignParentBottom="true"android:text="左下角"/></RelativeLayout>相对布局相对于同级控件<?xmlversion="1.0"encoding="utf-8"?><RelativeLayoutxmlns:android="https://schemas.android.com/apk/res/android"android:layout_width="match_parent"android:layout_height="match_parent"><!--这个是中间部分--><Buttonandroid:id="@+id/center_button"android:layout_width="wrap_content"android:layout_height="wrap_content"android:layout_centerInParent="true"android:text="确定"/><Buttonandroid:layout_width="wrap_content"android:layout_height="wrap_content"android:layout_centerVertical="true"android:layout_toLeftOf="@id/center_button"android:text="我在中间的左边"/><Buttonandroid:layout_width="wrap_content"android:layout_height="wrap_content"android:layout_above="@id/center_button"android:layout_centerHorizontal="true"android:text="我在中间的顶部"/><Buttonandroid:layout_width="wrap_content"android:layout_height="wrap_content"android:layout_centerVertical="true"android:layout_toRightOf="@id/center_button"android:text="我在中间的右边"/><Buttonandroid:layout_width="wrap_content"android:layout_height="wrap_content"android:layout_below="@id/center_button"android:layout_centerHorizontal="true"android:text="我在中间的底部"/></RelativeLayout>视频下载地址视频下载地址:链接:https://pan.baidu.com/s/1o8G7hCe密码:7qnt课程地址:https://www.sunofbeach.net/c/1179075373221081088

[文章] Jetpack学习笔记之LiveData (4)
LiveData是什么?官方定义:LiveData是一种可观察的数据存储器类。与常规的可观察类不同,LiveData具有生命周期感知能力,意指它遵循其他应用组件(如Activity、Fragment或Service)的生命周期。这种感知能力可确保LiveData仅更新处于活跃生命周期状态的应用组件观察者。完全看不懂!LiveData优势和特点如果观察者(由Observer类表示)的生命周期处于STARTED或RESUMED状态,则LiveData会认为该观察者处于活跃状态。LiveData只会将更新通知给活跃的观察者。为观察LiveData对象而注册的非活跃观察者不会收到更改通知。LiveData遵循观察者模式。当生命周期状态发生变化时,LiveData会通知Observer对象。观察者会绑定到Lifecycle对象,并在其关联的生命周期遭到销毁后进行自我清理。不会因Activity停止而导致崩溃。不再需要手动处理生命周期数据始终保持最新状态如果由于配置更改(如设备旋转)而重新创建了Activity或Fragment,它会立即接收最新的可用数据。LiveData类//抽象类abstractclassLiveData<T:Any!>LiveData通常是结合ViewModel一起使用。而且和ViewModel一样,同属于【androidx.lifecycle.*】包下LiveData是一个抽象类,一般不直接使用,主要使用其两个子类://MutableLiveData子类publicclassMutableLiveData<T>extendsLiveData<T>{@OverridepublicvoidpostValue(Tvalue){super.postValue(value);}@OverridepublicvoidsetValue(Tvalue){super.setValue(value);}}//MediatorLiveData子类publicclassMediatorLiveData<T>extendsMutableLiveData<T>{}LiveData使用//返回LiveData对象的值@NullableopenfungetValue():T?//更新LiveData对象的值@MainThreadprotectedopenfunsetValue(value:T):Unit//更新LiveData对象的值protectedopenfunpostValue(value:T):Unit//观察LiveData对象@MainThreadopenfunobserve(@NonNullowner:LifecycleOwner,@NonNullobserver:Observer<inT>):Unit//观察LiveData对象,观察者会被视为始终处于活跃状态,//需要通过removeObserver(Observer)手动移除@MainThreadopenfunobserveForever(@NonNullobserver:Observer<inT>):Unit可以按照以下步骤使用LiveData:1)创建LiveData实例以存储某种类型的数据。这通常在ViewModel类中完成。如:classNameViewModel:ViewModel(){//CreateaLiveDatawithaStringvalcurrentName:MutableLiveData<String>bylazy{MutableLiveData<String>()}//RestoftheViewModel...}2)创建可定义onChanged()方法的Observer对象,该方法可以控制当LiveData对象存储的数据更改时会发生什么。通常情况下,您可以在界面控制器(如Activity或Fragment)中创建Observer对象。3)使用observe()方法将Observer对象附加到LiveData对象。通常情况下,您可以在界面控制器(如Activity或Fragment)中附加Observer对象。classNameActivity:AppCompatActivity(){//Usethe'byviewModels()'Kotlinpropertydelegate//fromtheactivity-ktxartifactprivatevalmodel:NameViewModelbyviewModels()overridefunonCreate(savedInstanceState:Bundle?){super.onCreate(savedInstanceState)//创建观察者更新UIvalnameObserver=Observer<String>{newName->nameTextView.text=newName}//观察LiveDatamodel.currentName.observe(this,nameObserver)}}最简单示例本实例要实现的效果是,一个简单的加法计算器。如果用户输入2个整数,求和,如果输入不正确或输入为空,则提示请输入正确。效果如下:可以先思考一下,如果单纯使用上一节的ViewModel如何实现?ViewModel为什么要和LiveData结合呢?Xml代码<?xmlversion="1.0"encoding="utf-8"?><LinearLayoutxmlns:android="http://schemas.android.com/apk/res/android"xmlns:app="http://schemas.android.com/apk/res-auto"xmlns:tools="http://schemas.android.com/tools"android:layout_width="match_parent"android:layout_height="match_parent"android:orientation="vertical"tools:context=".MainActivity"><LinearLayoutandroid:layout_width="match_parent"android:layout_height="wrap_content"android:orientation="horizontal"android:gravity="center"android:layout_marginTop="80dp"><EditTextandroid:id="@+id/number1"android:layout_width="100dp"android:textSize="20sp"android:hint="0"android:textAlignment="center"android:layout_height="wrap_content"/><TextViewandroid:layout_width="50dp"android:layout_height="wrap_content"android:textAlignment="center"android:text="+"android:textSize="20sp"/><EditTextandroid:id="@+id/number2"android:layout_width="100dp"android:textSize="20sp"android:hint="0"android:textAlignment="center"android:layout_height="wrap_content"/></LinearLayout><TextViewandroid:id="@+id/resultText"android:layout_width="match_parent"android:layout_height="wrap_content"android:textSize="20sp"android:textAlignment="center"android:text="0"android:layout_marginTop="30dp"/><Buttonandroid:id="@+id/addBtn"android:layout_width="match_parent"android:layout_height="wrap_content"android:text="="android:textSize="30sp"android:layout_marginTop="50dp"/></LinearLayout>ViewModel和LiveDataclassMainViewModel:ViewModel(){//定义私有,防止外部修改privatevarresult:MutableLiveData<Int>=MutableLiveData()//设置初始值init{result.value=0}//通过setValue()更新值funadd(number1:Int,number2:Int){result.value=number1+number2}//通过getValue()取值fungetResult():MutableLiveData<Int>{/*if(result.value==null){result.value=0}*/returnresult}}Activity中使用classMainActivity:AppCompatActivity(){privatelateinitvarviewModel:MainViewModeloverridefunonCreate(savedInstanceState:Bundle?){super.onCreate(savedInstanceState)setContentView(R.layout.activity_main)//创建ViewModel实例viewModel=ViewModelProvider(this).get(MainViewModel::class.java)//设置初始化值,或SharedPreference的值resultText.text=viewModel.getResult().toString();valresultObserver:Observer<Int>=Observer<Int>{result->resultText.text=result.toString()}//观察LiveDada,viewModel.getResult().observe(this,resultObserver)//求和addBtn.setOnClickListener{if(number1.text.isNotEmpty()&&number2.text.isNotEmpty()){viewModel.add(number1.text.toString().toInt(),number2.text.toString().toInt())}else{resultText.text="请正确输入"}}}}PS:关于LiveData的介绍就到这里。后续还有更深入的关于LiveData的扩展转换,和协程和Room的一起使用。敬请关注

[文章] query did not return a unique result: 4;
简单说下,就是其他地方接口往数据库写的数据名称一样(例如key),然后根据key进行查找就报这样的错误,比如我在获取浏览量的接口那边web_size_view_count写成web_size_description,每次查询web_size_view_count都为空,每次数据库重复写web_size_description造成这样的问题
2021-03-28 00:36
·
query
[文章] 4、Android开发Jetpack-Databinding-import,variables,and includes
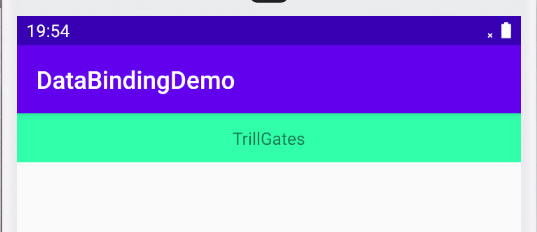
import,variables,andincludes导入[类],变量,包含(引入[布局])import我们一般用于导入类,比如说前面我们导入UserInfo,导入List类,而java.lang.*是默认导入的。variables,变量的意思,也就是我们的数据bean类include,包含,引入另外一个布局,子布局。达到某些布局可共用,减少重复代码。import官方的例子是这样<data><importtype="android.view.View"/></data>使用的时候就可以用值View里的常量了<TextViewandroid:text="@{user.lastName}"android:layout_width="wrap_content"android:layout_height="wrap_content"android:visibility="@{user.isAdult?View.VISIBLE:View.GONE}"/>别名如果我们导入两个同名的类,不同包名嘛。这个时候我们可以通过起别名的方式来使用。比如说,两个都是View<importtype="android.view.View"/><importtype="com.example.real.estate.View"alias="Vista"/>使用可以通过别名来使用VariablesVariables是变量的意思,你可以引入多个变量,这些在前面的代码里已经显示过了。比如说:<data><importtype="android.graphics.drawable.Drawable"/><variablename="user"type="com.example.User"/><variablename="image"type="Drawable"/><variablename="note"type="String"/></data>Includes使用场景,当我们当前这个xml布局include另外一个布局时,比如说:<?xmlversion="1.0"encoding="utf-8"?><layoutxmlns:android="http://schemas.android.com/apk/res/android"xmlns:bind="http://schemas.android.com/apk/res-auto"><data><importtype="com.sunofbeaches.databindingdemo.domain.User"/><variablename="user"type="User"/></data><LinearLayoutandroid:layout_width="match_parent"android:layout_height="match_parent"android:orientation="vertical"><includelayout="@layout/include_header_bar"bind:userInfo="@{user.name}"/></LinearLayout></layout>这样子,它包含了一个子布局,Include的方式添加进来所包含的内容是这样子的<?xmlversion="1.0"encoding="utf-8"?><layoutxmlns:android="http://schemas.android.com/apk/res/android"><data><variablename="userInfo"type="String"/></data><LinearLayoutandroid:layout_width="match_parent"android:layout_height="40dp"android:background="#33ffaa"><TextViewandroid:layout_width="match_parent"android:layout_height="match_parent"android:gravity="center"android:text="@{userInfo}"/></LinearLayout></layout>Activity的代码classIncludeActivity:AppCompatActivity(){overridefunonCreate(savedInstanceState:Bundle?){super.onCreate(savedInstanceState)valincludeBinding=DataBindingUtil.setContentView<ActivityIncludeBinding>(this,R.layout.activity_include)includeBinding.user=User("TrillGates",30,Gender.MALE)}}运行结果

[文章] AOSP Android 10内置FridaGadget实践02
环境:vmUbuntu18.04AOSP10_r41Pixel3as文件夹权限配置位置和文件:0x1:android-10.0.0_r41/system/sepolicy/public/file.te末尾增加一行这里和文件夹有关是
