对于web后台来说,最基本的功能就是对数据进行增删改查,也就是江湖上常说的CRUD
其他业务基本上为此进行服务的
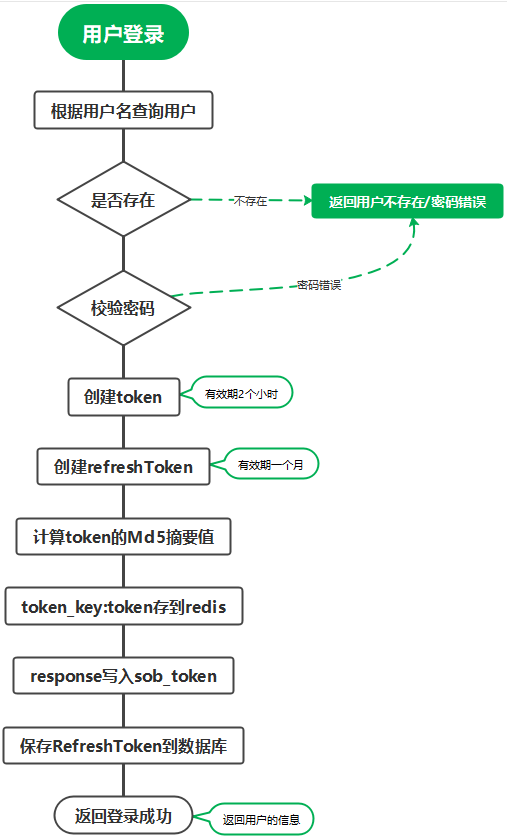
在此之前,我们要先有用户系统。我们的博客系统没对外公开注册,所以要手动添加用户。添加完就关闭此接口。
密码加密
对于账号来说,肯定涉及到密码的加密。最简单的方式,大家都知道MD5,SHA256
密码加密最基本两个要求
- 任何人不能看到密码明文,包括用户本人
- 即使拿到数据库的数据,也不能破解密码
可以参考一下这个
我们使用Spring-Securety完成这些工作
添加依赖
   <dependency>
            <groupId>org.springframework.boot</groupId>
            <artifactId>spring-boot-starter-security</artifactId>
        </dependency>
然后导入一下依赖
添加了这个依赖,默认是要你登录的,也就是会拦截所有的请求。
那怎么办呢?
添加配置文件,开放所有的接口
添加相关配置
在config包下
创建WebSecurityConfig
package net.sunofbeaches.config;

import org.springframework.context.annotation.Configuration;
import org.springframework.security.config.annotation.web.builders.HttpSecurity;
import org.springframework.security.config.annotation.web.configuration.EnableWebSecurity;
import org.springframework.security.config.annotation.web.configuration.WebSecurityConfigurerAdapter;


@Configuration
@EnableWebSecurity
public class WebSecurityConfig extends WebSecurityConfigurerAdapter {
    @Override
    protected void configure(HttpSecurity http) throws Exception {
        //所有都放行
        http.authorizeRequests()
                .antMatchers("/**").permitAll()
                .anyRequest().authenticated()
                .and().csrf().disable();
    }
}
同样,在config目录下
创建类BeanConfig
package net.sunofbeaches.config;

import net.sunofbeaches.utils.SnowflakeIdWorker;
import org.springframework.context.annotation.Bean;
import org.springframework.context.annotation.Configuration;
import org.springframework.security.crypto.bcrypt.BCryptPasswordEncoder;

@Configuration
public class BeanConfig {

    @Bean
    public SnowflakeIdWorker getIdWorker(){
        return new SnowflakeIdWorker(0,0);
    }

    @Bean
    public BCryptPasswordEncoder getPasswordEncoder() {
        return new BCryptPasswordEncoder();
    }
}
这里也有一个SnowflakeIdWorker的类
这个可以去查看一下这篇文章
在BeanConfi里添加
   @Bean
    public BCryptPasswordEncoder getPasswordEncoder() {
        return new BCryptPasswordEncoder();
    }
添加用户
创建一个服务UserServiceImpl,实现接口IUserService
package net.sunofbeaches.services;

import net.sunofbeaches.pojo.User;
import net.sunofbeaches.response.ResponseResult;

public interface IUserService {

    ResponseResult addUser(User user);

}
UserServiceImpl.java
package net.sunofbeaches.services.impl;

import net.sunofbeaches.pojo.User;
import net.sunofbeaches.response.ResponseResult;
import net.sunofbeaches.services.IUserService;
import org.springframework.beans.factory.annotation.Autowired;
import org.springframework.security.crypto.bcrypt.BCryptPasswordEncoder;
import org.springframework.stereotype.Service;

@Service
public class UserServiceImpl implements IUserService {

    @Autowired
    private BCryptPasswordEncoder passwordEncoder;

    @Override
    public ResponseResult addUser(User user) {
        return null;
    }
}
添加用户,我们这里面只添加一个,也就是管理员用户,所以我们先判断数据库里有不有,如果没有我们就添加进去。因为我们这里不公开注册。
看码吧
package net.sunofbeaches.services.impl;

import net.sunofbeaches.dao.UserDao;
import net.sunofbeaches.pojo.User;
import net.sunofbeaches.response.ResponseResult;
import net.sunofbeaches.services.IUserService;
import net.sunofbeaches.utils.SnowflakeIdWorker;
import net.sunofbeaches.utils.TextUtil;
import org.springframework.beans.factory.annotation.Autowired;
import org.springframework.security.crypto.bcrypt.BCryptPasswordEncoder;
import org.springframework.stereotype.Service;

@Service
public class UserServiceImpl implements IUserService {

    @Autowired
    private BCryptPasswordEncoder passwordEncoder;

    @Autowired
    private SnowflakeIdWorker idWorker;


    @Autowired
    private UserDao userDao;

    @Override
    public ResponseResult addUser(User user) {
        //检查是否已经添加过用户了
        long count = userDao.count();
        if (count > 0) {
            return ResponseResult.FAILED("用户已经添加");
        }
        //检查用户数据
        if (TextUtil.isEmpty(user.getUserName())) {
            return ResponseResult.FAILED("用户名为空");
        }
        if (TextUtil.isEmpty(user.getPassword())) {
            return ResponseResult.FAILED("密码不可以为空");
        }
        if (TextUtil.isEmpty(user.getEmail())) {
            return ResponseResult.FAILED("邮箱不可以为空");
        }
        //补充数据
        //ID
        user.setId(idWorker.nextId() + "");
        //设置头像
        user.setAvatar("/images/default_avatar.png");
        //加密码密码
        user.setPassword(passwordEncoder.encode(user.getPassword()));
        //送入洞房
        userDao.save(user);
        return ResponseResult.SUCCESS("添加成功");
    }
}
调用呢?
package net.sunofbeaches.controller;

import net.sunofbeaches.pojo.User;
import net.sunofbeaches.response.ResponseResult;
import net.sunofbeaches.services.IUserService;
import org.springframework.beans.factory.annotation.Autowired;
import org.springframework.web.bind.annotation.*;

@RestController
@RequestMapping("/user")
@CrossOrigin
public class UserController {

    @Autowired
    private IUserService userService;


    /**
     * 添加用户
     *
     * @param user
     * @return
     */
    @PostMapping
    public ResponseResult addUser(@RequestBody User user) {
        return userService.addUser(user);
    }
}
也就是说,当我们请求
localhost:8080/user
携带用户信息时就可以添加用户了
测试
我们使用postman模拟一下请求,提交数据看看
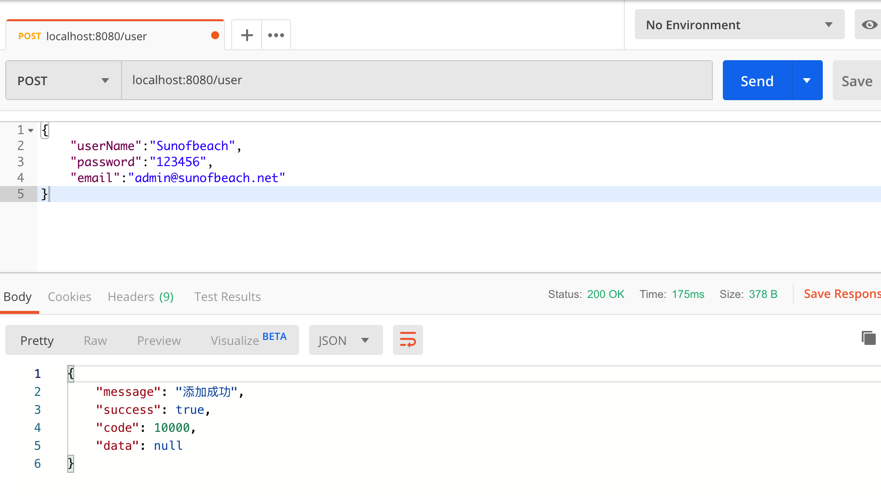
这就添加进来了!

当然啦,我们这里使用的明文,而从客户端传到服务端,也要进行加密,简单的可以使用md5进行加密即可。
然后直接把加密后的md5值再进行加密。
okay啦,我们先到这里,后面我们再去实现用户相关的其他功能。