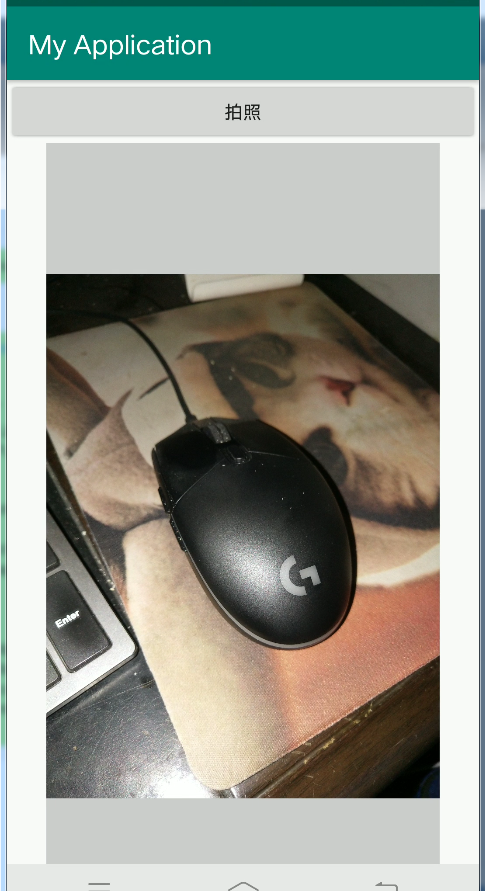

问题:android调用相机拍照功能。

直接上代码:
1,xml代码,上面拍照控件,下面显示照片控件。
<LinearLayout xmlns:android="http://schemas.android.com/apk/res/android"

    android:orientation="vertical"
    android:layout_width="match_parent"
    android:layout_height="match_parent">

    <Button
        android:id="@+id/take_photo"
        android:text="拍照"
        android:layout_width="match_parent"
        android:layout_height="wrap_content" />

    <ImageView
        android:id="@+id/picture"
        android:layout_width="300dp"
        android:layout_height="600dp"
        android:background="#cccccc"
        android:layout_gravity="center_horizontal"/>
</LinearLayout>
2,MainActivity代码
注意:ImageUri= FileProvider.getUriForFile(MainActivity.this, "com.test.test.fileprovider",outputImage); 这里的 com.test.test.fileprovider 要修改成你项目的 包名+fileprovider 。
public class MainActivity extends AppCompatActivity {
    public static final int TAKE_PHOTO=1;
    private static final String TAG = "MainActivity";
    private ImageView picture;
    private Uri ImageUri;
    private Button takePhoto;
    @Override
    protected void onCreate(Bundle savedInstanceState) {
        super.onCreate(savedInstanceState);
        setContentView(R.layout.activity_main);
        takePhoto= (Button) findViewById(R.id.take_photo);
        picture = (ImageView) findViewById(R.id.picture);
        takePhoto.setOnClickListener(new View.OnClickListener() {
            @Override
            public void onClick(View v) {
                //创建File对象,用于存储拍照后的图片
                File outputImage = new File(getExternalCacheDir(),"outputImage.jpg");
                try {
                    if (outputImage.exists()){
                        outputImage.delete();
                    }
                    outputImage.createNewFile();
                } catch (IOException e) {
                    e.printStackTrace();
                }
                //判断SDK版本高低,ImageUri方法不同
                if (Build.VERSION.SDK_INT>=24){
                    ImageUri= FileProvider.getUriForFile(MainActivity.this, "com.test.test.fileprovider",outputImage);
                }else {
                    ImageUri=Uri.fromFile(outputImage);
                }
                //启动相机程序
                Intent intent=new Intent("android.media.action.IMAGE_CAPTURE");
                intent.putExtra(MediaStore.EXTRA_OUTPUT,ImageUri);
                startActivityForResult(intent,TAKE_PHOTO);
            }
        });
    }

    @Override
    protected void onActivityResult(int requestCode, int resultCode, Intent data) {
        super.onActivityResult(requestCode, resultCode, data);

        switch (requestCode) {
            case TAKE_PHOTO:
                if (resultCode == RESULT_OK ) {
                    try {
                        //将拍摄的照片显示出来
                        Bitmap bitmap = BitmapFactory.decodeStream(getContentResolver().openInputStream(ImageUri));
                        picture.setImageBitmap(bitmap);
                        Log.d(TAG, "   ImageUri---------> " + ImageUri);
                    } catch (FileNotFoundException e) {
                        e.printStackTrace();
                    }
                }
                break;
            default:
                break;
        }
    }
}
3,AndroidManifest.xml中要添加的代码
注意:android:authorities="com.test.test.fileprovider" ,后面是 包名+fileprovider。 下面:android:resource="@xml/file_paths" ,这里的xml文件自己建立,在res目录下,然后xml下面建设file_paths.xml文件。
<provider
            android:name="androidx.core.content.FileProvider"
            android:authorities="com.test.test.fileprovider"
            android:exported="false"
            android:grantUriPermissions="true"
            >
            <meta-data
                android:name="android.support.FILE_PROVIDER_PATHS"
                android:resource="@xml/file_paths" />
        </provider>
4,file_paths 文件代码
<?xml version="1.0" encoding="utf-8"?>
<paths xmlns:android="http://schemas.android.com/apk/res/android">
    <external-path name="my_images" path=""/>
</paths>
来开始捋一捋流程:
第一,找到两个控件。
第二,拍照之前,传进一个File对象outputImage,主要用来存放相机拍摄得到的照片,存放在SD卡下面的缓存目录。/sdcard/Android/data/
第三,判断outputImage文件是否存在,有的话就删除,没有就重新创建。这个不能用于项目,因为多数我们项目拍照都需要拍照然后显示照片,同时照片也要留在相册里面,这个测试项目里面就没有办法将照片留在手机里面,每次拍照outputImage都会被清理掉。
第四,后面就是构建intent,通过putExtra来制定图片输出地址,这里填入的就是uri对象,之后调用startActivityForResult启动活动。
第五,对应startActivityForResult,拍照结束会返回结果,那就是onActivityResult()方法,重写这个方法,来处理你的数据,这里就是显示它。
第六,拍照成功,调用BitmapFactory的decodeStream方法将output_image.jpg这张图片解析成Bitmap对象,然后把它设置到ImageView中显示出来。
最后:注意:manifest.xml的设置,还有xml下面文件的创建。当然还有就是相机请求的时候有权限的问题要解决,这里就不多说了,大家可以查阅更多的文章。
既然看到这里了,就来个