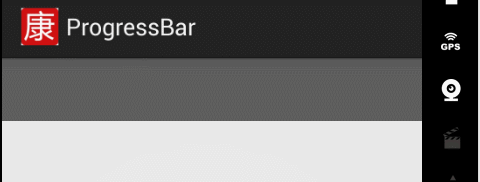
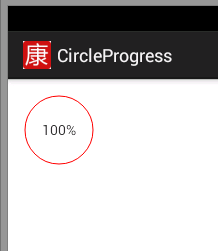
android自己控件-环形的进度条
其实这没什么难度的,是吧!只要小手一抖就出來了!
很久没有写东西了,忙哇!况且,写的东西貌似没什么太难的,如果真要写一篇好文章,的确需要时间去准备!
好吧,现在就写一个环形进度条吧!
或许称之为环形进度圈圈更好玩!
创建一个环形进度的布局文件
只需要一个ImageView和一个TextView即可,简单是吧!我把代码贴一下!
<?xml version="1.0" encoding="utf-8"?>
<RelativeLayout xmlns:android="https://schemas.android.com/apk/res/android"
    android:layout_width="70dp"
    android:layout_height="70dp"
    android:orientation="vertical" >

    <ImageView
        android:id="@+id/iv_circle"
        android:layout_width="70dp"
        android:layout_height="70dp"
        android:layout_centerInParent="true" />

    <TextView
        android:id="@+id/tv_ratio"
        android:layout_width="wrap_content"
        android:layout_height="wrap_content"
        android:layout_centerInParent="true"
        android:text="百分比" />

</RelativeLayout>
创建一个类,去继承RelativeLayout
然后实现构造方法,还是在代码里详细说明一下吧
package com.sunofbeaches.circleprogress;

import android.content.Context;
import android.graphics.Canvas;
import android.graphics.Color;
import android.graphics.Paint;
import android.graphics.Paint.Style;
import android.graphics.RectF;
import android.util.AttributeSet;
import android.view.View;
import android.widget.ImageView;
import android.widget.RelativeLayout;
import android.widget.TextView;

/**
 * @项目名称:CircleProgress
 * @包名:com.sunofbeaches.circleprogress
 * @类名:CircleProgress.java
 * @作者:sunofbeaches.com
 * @创建时间:2015-11-17上午1:37:56
 * @描述:TODO
 *
 * @svn版本:$Rev$
 * @更新人:$Author$
 * @更新时间:$Date$
 * @更新描述:TODO:
 */

public class CircleProgress extends RelativeLayout {

	private ImageView mIv;
	private TextView mTv;

	private RectF mOval;

	// 控制是否可用
	private boolean mProgressEnable;

	// 进度
	private int mProgress;

	// 最大值
	private int mMax = 0;

	// 画笔
	Paint mPaint = new Paint();

	// 弧线颜色
	private int CIRCLE_LINE_COLOR = Color.parseColor("#ff0000");
	// 弧线大小
	private int CIRCLE_LINE_SIEZ = 1;

	public CircleProgress(Context context) {
		this(context, null);// 确保调用到第二个构造方法
	}

	public CircleProgress(Context context, AttributeSet attrs) {
		super(context, attrs);

		// 挂载界面
		View view = View.inflate(context, R.layout.circle_layout, this);// 这里要注意this哦,挂到同一组

		// 找到对应的控件
		mIv = (ImageView) view.findViewById(R.id.iv_circle);
		mTv = (TextView) view.findViewById(R.id.tv_ratio);

	}

	public void setProgressEnable(boolean enable) {
		this.mProgressEnable = enable;
	}

	public void setProcess(int progress) {
		this.mProgress = progress;
		invalidate();// 不要忘记调用invalidate方法哦!
	}

	public void setMax(int max) {
		this.mMax = max;
	}

	public void setText(String text) {
		mTv.setText(text);
	}

	// 覆写onDraw方法
	@Override
	protected void onDraw(Canvas canvas) {

		if (mProgressEnable) {// 如果可用才进行画

			if (mOval == null) {
				// 画弧线的第一个参数:也就是在一个矩形里的画一个圆

				// 因为把这个圆画在ImageView里头,所以直接获取ImageView的各边位置即可,也就是在其内部画圆

				float left = mIv.getLeft() + CIRCLE_LINE_SIEZ;
				float top = mIv.getTop() + CIRCLE_LINE_SIEZ;
				float right = mIv.getRight() - CIRCLE_LINE_SIEZ;
				float bottom = mIv.getBottom() - CIRCLE_LINE_SIEZ;

				mOval = new RectF(left, top, right, bottom);
			}

			float startAngle = -90;// 开始的角度,这里的角度,水平方向,也就是x轴方向为零度

			// 如果为0则设其为100
			if (mMax == 0) {
				mMax = 100;
			}
			float sweepAngle = mProgress * 360 * 1f / mMax + 0.5f;// 扫过的角度,相信聪明的你一定能理解的哈!
			boolean useCenter = false;// 是否绕中心画,自己体会一下,修改测试一下吧,不好描述(后面我录制一个动画吧),嘻嘻!
			// 画笔一个view只要支就可以了,在前面创建了
			/**
			 * 参数意思:不解释了,直接看写的代码也能看懂的哈!
			 *
			 * @param oval
			 *            The bounds of oval used to define the shape and size
			 *            of the arc
			 *
			 * @param startAngle
			 *            Starting angle (in degrees) where the arc begins
			 * @param sweepAngle
			 *            Sweep angle (in degrees) measured clockwise
			 * @param useCenter
			 *            If true, include the center of the oval in the arc,
			 *            and close it if it is being stroked. This will draw a
			 *            wedge
			 * @param paint
			 *            The paint used to draw the arc
			 */

			// 画扇形---->相关设置----->弧线

			// 设置抵抗锯齿
			mPaint.setAntiAlias(true);

			// 设置样式
			mPaint.setStyle(Style.STROKE);

			// 设置大小
			mPaint.setStrokeWidth(CIRCLE_LINE_SIEZ);// 也就是弧线的粗度,前面定义的常量

			// 设置弧线颜色
			mPaint.setColor(CIRCLE_LINE_COLOR);

			canvas.drawArc(mOval, startAngle, sweepAngle, useCenter, mPaint);

		}

		super.onDraw(canvas);
	}
}
使用
复制上面这个类的全路径类名到主布局文件上
当然,在那个布局文件使用就复制到那里,这里呢,在主布局文件里演示,所以我就复制到那里啦!
对了,一定要注意哦,要设置一个背景哦,要不,,呵呵,不会调用onDraw方法,也就是看不到画出來的效果哦,要设置背景!
<RelativeLayout xmlns:android="https://schemas.android.com/apk/res/android"
    xmlns:tools="https://schemas.android.com/tools"
    android:layout_width="match_parent"
    android:layout_height="match_parent"
    android:paddingBottom="@dimen/activity_vertical_margin"
    android:paddingLeft="@dimen/activity_horizontal_margin"
    android:paddingRight="@dimen/activity_horizontal_margin"
    android:paddingTop="@dimen/activity_vertical_margin"
    tools:context=".MainActivity" >

    <com.sunofbeaches.circleprogress.CircleProgress
        android:id="@+id/cp_circle_progress"
        android:layout_width="wrap_content"
        android:layout_height="wrap_content"
        android:background="#ffffff" />

</RelativeLayout>
编写调用的方法啦
废话不多说,直接上代码,后面我录制动画來说明相关的属性哈!
package com.sunofbeaches.circleprogress;

import android.os.AsyncTask;
import android.os.Bundle;
import android.app.Activity;
import android.view.Menu;
import android.view.View;
import android.view.View.OnClickListener;

public class MainActivity extends Activity implements OnClickListener {

	private CircleProgress mCircleProgress;

	@Override
	protected void onCreate(Bundle savedInstanceState) {
		super.onCreate(savedInstanceState);
		setContentView(R.layout.activity_main);

		// 找到circleProgress
		mCircleProgress = (CircleProgress) this
				.findViewById(R.id.cp_circle_progress);

		// 设置点击监听
		mCircleProgress.setOnClickListener(this);

	}

	@Override
	public boolean onCreateOptionsMenu(Menu menu) {
		// Inflate the menu; this adds items to the action bar if it is present.
		getMenuInflater().inflate(R.menu.main, menu);
		return true;
	}

	@Override
	public void onClick(View v) {

		if (v == mCircleProgress) {
			mCircleProgressClick();
		}

	}

	private void mCircleProgressClick() {
		new AsyncTask<Void, Integer, Void>() {

			@Override
			protected Void doInBackground(Void... params) {

				// 模拟一下
				for (int i = 0; i <= 100; i++) {
					try {
						Thread.sleep(100);
					} catch (InterruptedException e) {
						e.printStackTrace();
					}

					publishProgress(i);
				}

				return null;
			}

			@Override
			protected void onPreExecute() {
				// 事先准备,设置可用
				mCircleProgress.setProgressEnable(true);
			}

			@Override
			protected void onProgressUpdate(Integer... values) {
				// 更新UI
				mCircleProgress.setProcess(values[0]);

				// 设置百分比
				mCircleProgress.setText(values[0] + "%");

			}

		}.execute();// 执行

	}

}
解析:关于boolean useCenter = true/false;
这两个有什么不同呢,看一个效果就知道啦!看官准备啦,下面:
属性值为:true的时候
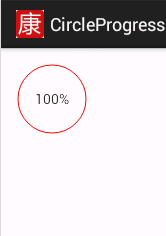
属性值为:false的时候
好啦,已经凌晨两点半了,我想我要睡一会儿了,嘻嘻!亲爱的小伙伴们,晚安哦!